Reading Nook Bookcase Wall: 9 No-Carpenter Builds That Actually Work

You don’t need a finish carpenter, a Saturday with a contractor, or a saw you’ve never used. A reading nook bookcase wall comes together with flat-pack uprights, a few brackets, and a clear plan for the gap where the seat lives. We’re skipping the heavy plywood projects, the dentil molding, and the rolling library ladders. Picture a floor-to-ceiling bookcase wall that wraps around a daybed-sized opening, lit by a plug-in sconce, anchored safely, and finished by Sunday night. Here’s the exact build, with measurements that actually work.

Floor-to-Ceiling Bookcase Walls You Can Build Without a Carpenter
Three methods cover almost every situation, and none of them need a power saw bigger than a jigsaw.
1. The IKEA Billy + Trim Method. Stack standard 79-inch Billy bookcases side by side, then add a strip of 1×6 pine across the top to hide the gap between the bookcase tops and your ceiling. The result reads as built-in from six feet away. Total time: about 5 hours for two people.
2. The Adjustable Tower Method. Use modular cube units (think IKEA Kallax or any 13×13-inch cube system) stacked in a U shape around your reading seat. Zero trim. Zero saw work. You can disassemble it on moving day in under an hour.
3. The Tension-Mount Renter Method. Two adjustable closet-rod tension towers (the kind that pressure-fit between floor and ceiling) hold floating shelves on either side of an armchair. No drill required, and the towers come down without a single hole in the wall.
Here’s the honest part. Method 1 looks the most like a true built-in. Method 2 ships and assembles fastest. Method 3 is the only option if your lease bans holes bigger than a nail.
The first bookcase wall I built used Method 1, and I cut the top trim half an inch short on day one. Measure ceiling height in three spots before you buy lumber. Old apartments slope.

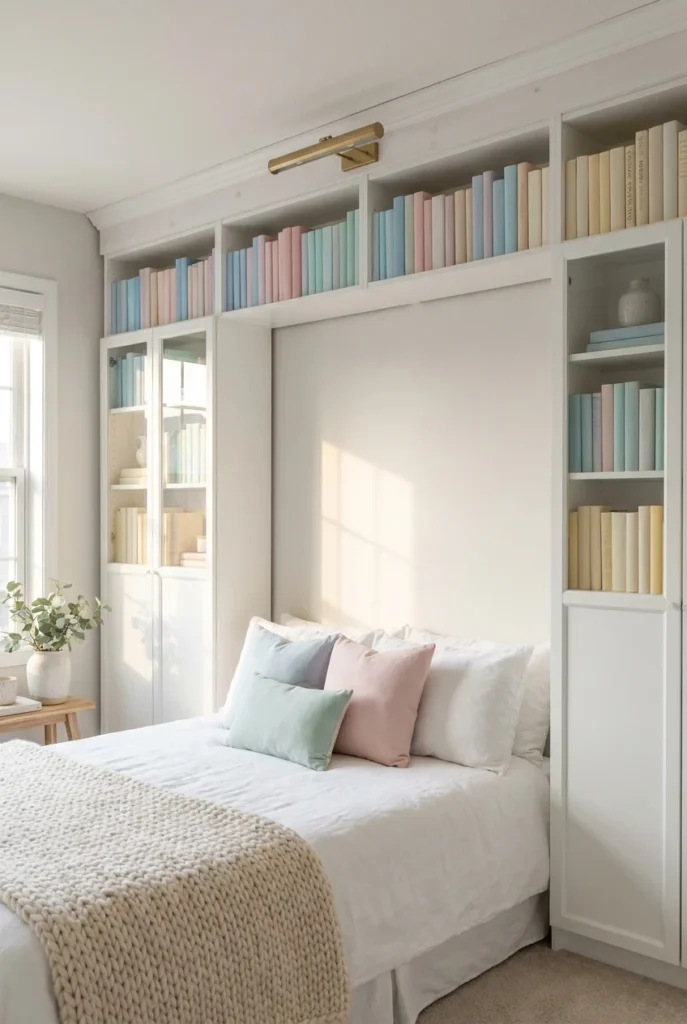
The Bookcase-Wall-Around-a-Nook Layout
Most bookcase walls treat the shelves as the hero and the seating as an afterthought. Flip that. In a reading nook bookcase wall, the shelves are the frame, and the negative space (the nook itself) is the star.
Picture three vertical zones across one wall:
- Left tower: 32 inches wide, full height, packed with books and a brass picture light up top.
- Center opening: 48 inches wide, 60 inches tall, deep enough for a twin daybed mattress or a 22-inch-deep upholstered bench.
- Right tower: 32 inches wide, matching the left.
That center gap is your nook. The towers do the storage. Your eye reads the wall as one unit because the shelves run from floor to ceiling, but you can actually sit inside the wall the way you’d sit inside a bay window.
Trade-off honesty: this layout eats about 5 feet of wall length minimum. If your wall is under 8 feet, run the bookcases only on one side and let the nook tuck into a corner instead. Better to do half the wall well than the full wall awkwardly.
I learned this after squeezing 9 feet of shelving onto a 7-foot wall in my old apartment. The bookcases looked beautiful. There was no room left to actually sit down.

IKEA Billy Bookcase Reading Nook: The 3-Unit Formula
This is the cheapest, fastest path to a real reading nook bookcase wall, and it sits at the top of Pinterest for a reason.
The formula:
- 2 standard Billy bookcases (31½ inches wide, 79 inches tall, 11¾ inches deep), one on each side of the nook.
- 1 short Billy bookcase (31½ inches wide, 41¾ inches tall) placed under a window or above a daybed as a half-height connector.
- A 1×6 pine board across the top, painted to match the bookcases, closing the 4 to 6 inch gap to an 8-foot ceiling.
Total cost runs $260 to $340 depending on whether you grab the laminate version or splurge on the OXBERG door inserts for hidden storage at the bottom. (Tuck your charging cables and modem into those lower cabinets. Future you will say thank you.)
For the full build sequence with screwdriver-by-screwdriver photos, see our Billy bookcase reading nook around a daybed tutorial. The dimensions there match what we’re describing here.
Billy comes in heights and widths beyond the standard. The full sizing chart and finish options live on the official IKEA Billy bookcase product page, which is worth checking before you order because the lineup changes a couple of times a year.
So why Billy and not a similar bookcase from elsewhere? Three reasons. The 11¾-inch depth holds standard hardcovers without squeezing them. The shelves adjust in 1-inch increments. And the back panel is thin enough that you can swap it for fluted wood or wallpaper to dress the unit up without rebuilding it.
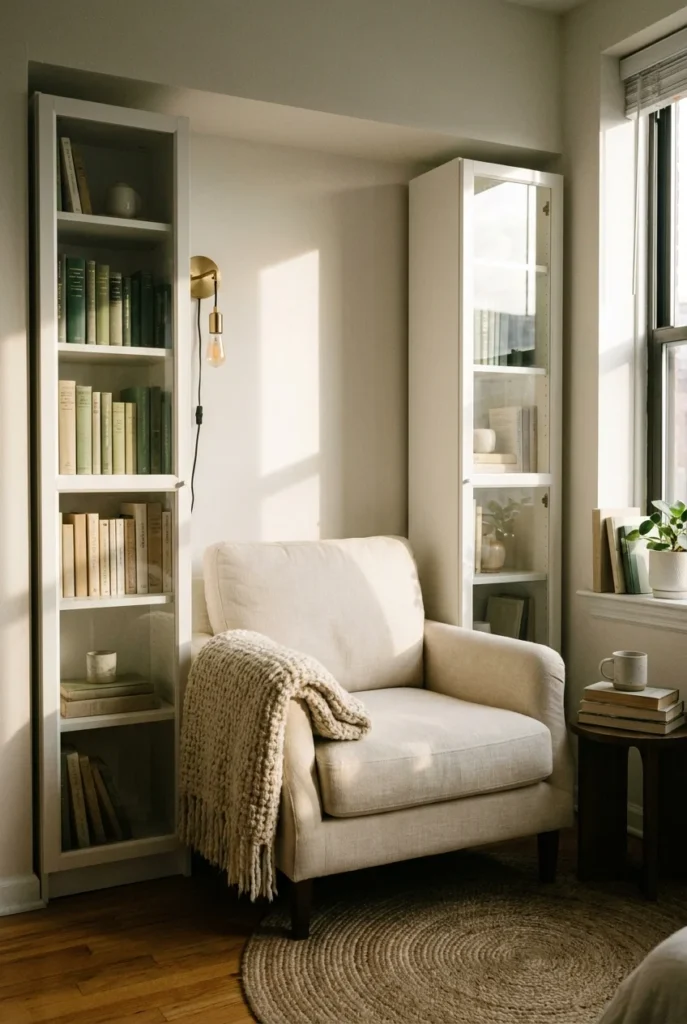
Reading Nook Between Two Bookcases: Small-Space Floor Plan
If you’re working with under 100 square feet of room, the between-bookcases layout still works. You just shrink it.
Here’s the minimum viable footprint:
- Nook opening: 36 inches wide, 60 inches tall, 22 inches deep.
- Bookcase on each side: 15½ inches wide (the Billy half-width), full 79 inches tall.
- Total wall length needed: 67 inches. That’s 5 feet 7 inches.
A 36-inch opening fits an upholstered armchair, a stacked floor cushion setup, or a bench cut down from a twin headboard. It won’t fit a daybed. Daybeds are a luxury here. They aren’t a requirement.
For more layouts that work in tight rooms (studios, dorm corners, that 7-foot wall in your guest room), our guide on tiny reading nook ideas under 1 square meter covers configurations that strip the bookcase wall down to a single tall unit beside a low bench.
The sensory test for a small nook: sit in it for 10 minutes with a hardcover. If your neck cranes forward to catch the lamp, the seat is too deep. If your elbows hit the shelves, the opening is too narrow. Adjust before you commit to drilling.
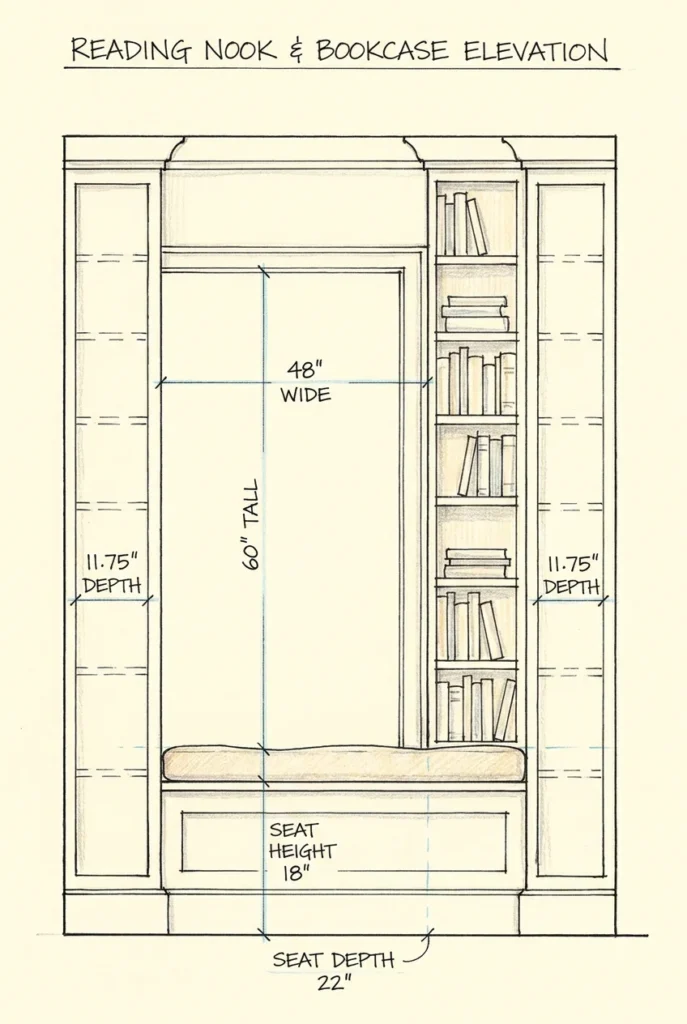
Sizing the Nook Inside a Bookcase Wall
Numbers do most of the work here. Memorize this mini table before you order anything.
Reading Nook Inside Bookcase Wall, Quick-Spec Table:
| Element | Minimum | Sweet Spot | Maximum |
|---|---|---|---|
| Nook opening width | 32 in | 48 in | 60 in |
| Nook opening height | 54 in | 60 in | 72 in |
| Nook seat depth | 18 in | 22 in | 26 in |
| Seat height from floor | 16 in | 18 in | 20 in |
| Bookcase depth flanking nook | 10 in | 11¾ in | 14 in |
| Side table reach (the 18-inch rule) | 14 in | 18 in | 22 in |
Two rules to write on a sticky note. The 18-inch reach rule: your side table or shelf should sit within 18 inches of your dominant hand, no further, so you can grab a mug without breaking your reading position. The 22-inch seat depth rule: anything shallower forces your back to do the work. Anything deeper invites your knees to lock up after 30 minutes.
For the actual bench inside the nook (if you’re building one rather than dropping a chair in), our built-in reading bench with storage plans walks through the box construction, lid hinges, and cushion dimensions that match the 22-inch sweet spot above.
Skip these numbers and you’ll end up with a nook that looks like a magazine spread and reads like a doctor’s waiting room. The dimensions are the difference.
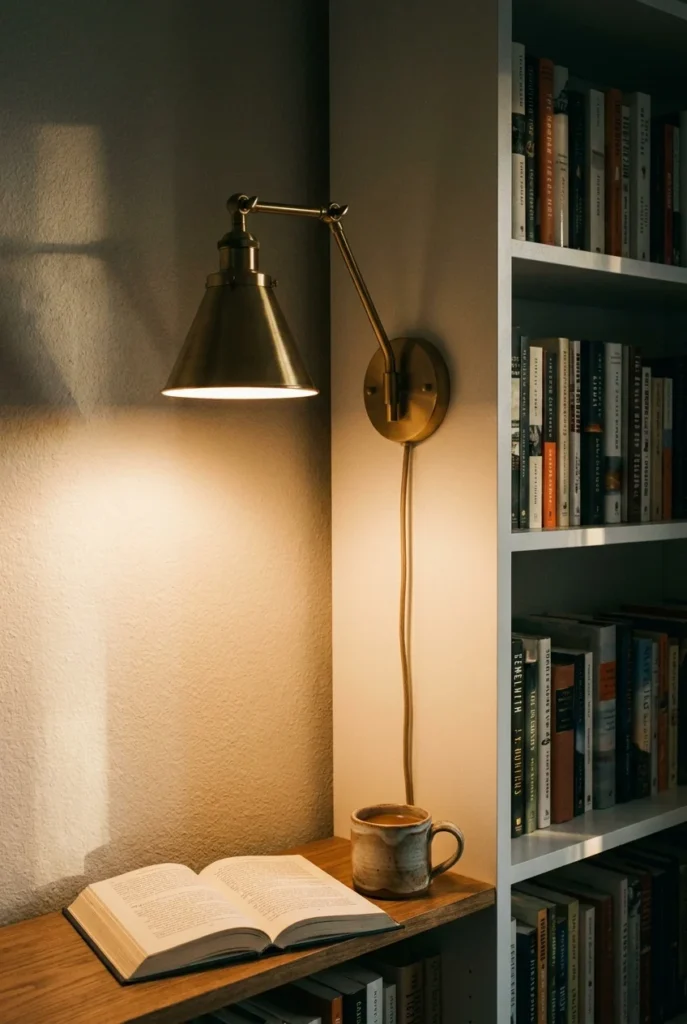
Lighting a Bookcase Wall Without Wiring
Here’s where most builds fall apart. The overhead fixture in your room casts shadow straight down into the nook, and your face ends up dim while the wall behind you stays bright. You need light at reading height, on the bookcase wall itself, ideally at 2700K so your eyes don’t fight the color.
Three lighting setups that don’t need an electrician:
Plug-in wall sconces. Mount two on the towers flanking the nook, one on each side at 60 inches from the floor. Cords run down the back of the bookcase and into a wall outlet behind the unit. Brands like Hudson Valley, Mitzi, and the budget Sazo line carry plug-in versions of their hardwired sconces.
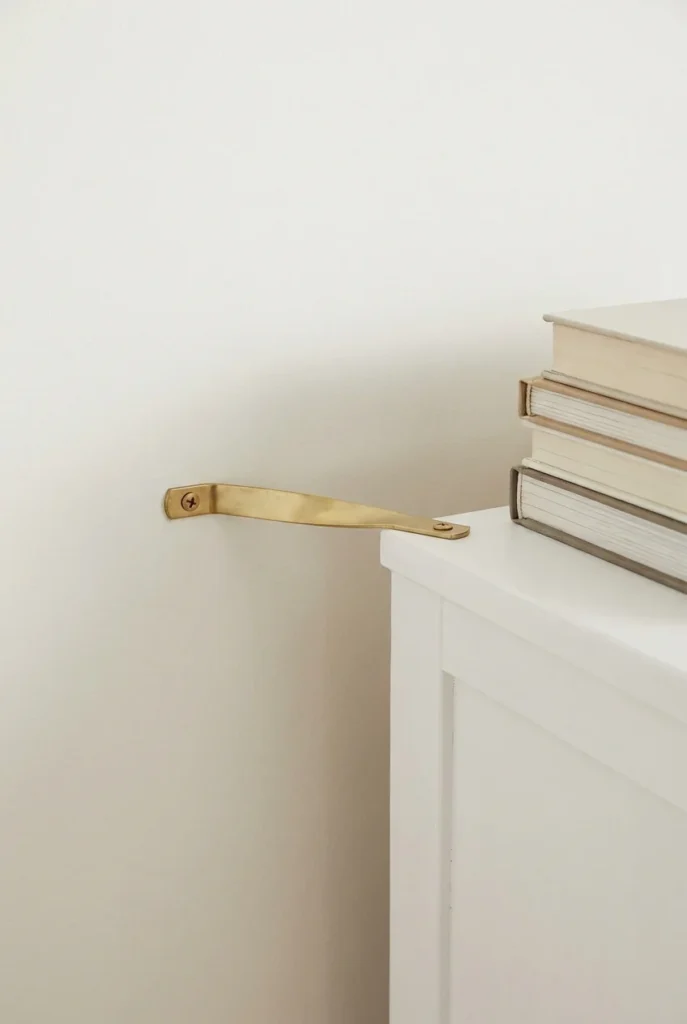
Picture lights on top of each bookcase tower. Battery-powered or plug-in. A 12-inch brass picture light at the top of a Billy reads as architectural even though you install it with a single screw.
Clip-on reading light on the highest shelf. Honestly the cheapest fix, around $30 from Target or Amazon. Aim it at your book, not the wall.
Failure mode. Skip the dimmer and your 2700K bulbs still feel clinical at night. A $15 plug-in dimmer module fixes the entire mood. Without it, the corner reads like a dentist’s office at 9 p.m.
The quiet weight of a heavy book on your lap. A wool throw at the ankles. Light warm enough to soften the edge of the room. That’s what 2700K and a dimmer buy you.
Anchoring, Tip-Over Prevention, and Why It Matters
A floor-to-ceiling bookcase wall holds serious weight. A fully loaded Billy can hit 250 pounds before you count the bookcase itself. If it tips, somebody underneath does not walk away easy.
Every tall bookcase in a reading nook bookcase wall gets anchored. No exceptions. The CPSC has tracked thousands of tip-over injuries from unanchored furniture and runs an ongoing safety campaign called Anchor It from the U.S. Consumer Product Safety Commission with installation guidance worth reading before you load a single shelf.
The two-screw rule:
- One anchor strap per bookcase, attached to a wall stud (not drywall alone) using a 2-inch wood screw.
- For brick or plaster walls without studs, use a toggle bolt rated for 50 pounds minimum per bookcase.
Renters worried about wall damage. A single toggle bolt leaves a hole roughly ½ inch wide. Patch it with spackle on move-out day in under 5 minutes. That hole is a fair trade for not crushing a child or a pet.
Load distribution matters too. Heaviest books on the bottom three shelves. Mid-weight at chest height. Decorative objects and lightweight art books up top. A top-heavy bookcase tips faster than a balanced one even when anchored.
Styling the Shelves So the Nook Stays the Star
The bookcase wall is the frame. The nook is the painting. If the shelves outshout the seat, the room loses its center.
Three styling moves that keep the eye on the nook:
Color-block your books. Group spines by color across the entire wall (not per shelf). The blocks read as background pattern. Your eye then lands on the seating area in the middle instead of bouncing across 200 individual spines.
Leave breathing room. Every third shelf should be only 60 percent full. A leaning stack of three books, one ceramic vessel, a small framed print. White space on shelving works the same way it works on a page.
Match the back panel to the wall paint. If your wall is warm white, paint the Billy backs warm white. The shelves visually dissolve and the nook reads as a deeper, set-back room within the room. This single move takes a Billy wall from looking like dorm furniture to looking architectural.
A note on book direction. Spines out for the everyday books you actually read. Pages out (spines hidden) for the decorative stacks. Mix both within a single shelf for visual rhythm. Pure pages-out shelving is a Pinterest trick that fails the practical-friend test because you cannot find anything.

Five Mistakes That Make a Bookcase Wall Feel Like a Storage Unit
Everyone makes at least one of these. I made three on my first build.
1. Skipping the top trim. A 4-inch gap between bookcase tops and the ceiling is the single biggest tell that you bought it flat-pack. A $14 piece of pine 1×6 painted to match closes the gap and adds 80 percent of the built-in look.
2. Forgetting the baseboard cut-out. Standard bookcases sit flush to the wall only after you notch the bottom rear to clear the baseboard. Skip this and the bookcase tilts forward an inch. The whole wall reads crooked.
3. Loading books before anchoring. Tempting. Don’t. Anchor empty bookcases first. Always.
4. Lighting from above only. Overhead light from a ceiling fixture throws your own shadow onto the page. Side lighting at reading height is the entire point of the sconce setup in section 6.
5. Cramming the nook seat to the wall. Leave 2 inches between the back of any cushion and the wall behind it. The gap lets air circulate, prevents mold in humid climates, and stops the cushion from compressing oddly against the baseboard.
The first wall I built broke rules 1, 2, and 4 in a single afternoon. The bookcases tipped forward. The light was wrong. The gap at the top glared. I fixed it in a long second weekend with $40 of trim and one $25 plug-in sconce. Worth every minute.

Reading Nook Bookcase Wall FAQ
How wide should a reading nook be between two bookcases?
The minimum useful width is 32 inches, the sweet spot is 48 inches, and the maximum before the nook starts to feel exposed is 60 inches. A 48-inch opening fits a twin daybed mattress sideways or a wide upholstered bench with room to tuck in a side table.
Can you build a floor-to-ceiling bookcase without a carpenter?
Yes. Use IKEA Billy or any flat-pack tall bookcase, stack them side by side, and add a 1×6 pine strip across the top to close the ceiling gap. The whole project takes one weekend with two people and basic tools (drill, level, stud finder). No saw work beyond a single straight cut on the top trim.
How do you make an IKEA Billy bookcase look built-in?
Three moves do most of the heavy lifting. Paint the back panel the same color as the wall behind it. Add a 1×6 top trim to close the ceiling gap. Run a 1×4 baseboard piece across the bottom front to match the existing baseboard profile in your room. Total cost is around $40 in materials.
How do you anchor a floor-to-ceiling bookcase wall safely?
Every bookcase in the wall gets at least one anchor strap attached to a wall stud with a 2-inch wood screw. For non-stud installations, use toggle bolts rated for 50 pounds each. Anchor before loading any books. The CPSC’s Anchor It campaign covers the exact hardware to use for different wall types.
What’s the best lighting for a bookcase wall reading nook?
Plug-in wall sconces mounted at 60 inches from the floor, on the bookcase towers flanking the seat. Use 2700K bulbs and add a plug-in dimmer. This setup beats overhead lighting because the light hits your book directly without casting a shadow from your own head.
Can a bookcase wall reading nook work in a rental?
Yes. Use freestanding bookcases anchored with removable tension straps, plug-in sconces (zero wiring), and a daybed or bench that isn’t attached to the wall. The only wall damage is one anchor screw per bookcase, which patches with spackle in 5 minutes on move-out.
How deep should the reading nook seat be inside a bookcase wall?
Between 18 and 26 inches, with 22 inches being the sweet spot for most adults. Less than 18 inches forces you to perch instead of lounge. More than 26 inches and your knees lose their bend, which gets uncomfortable after about half an hour.
A Quick Word Before You Start
This is a one-weekend project for the build itself, but the styling phase is where it becomes yours. Give yourself two more weekends to swap throws, test bulb temperatures, and live with the nook before you call it done. The first version of any reading nook bookcase wall is the rough draft. The second is the one you’ll keep.
So pick your wall, measure twice, and order the bookcases tonight. What’s the one wall in your home that’s been begging for this build? Sit in front of it for a minute and decide what’s actually stopping you.
Keep reading
More cozy nook ideas
 DIY
Read →
DIY
Read →
Corner Bookshelf Reading Nook Ideas: 9 Cozy Builds for a Small Space
No bay window, no reno budget, no friendly landlord required. You need one empty corner, a corner bookshelf, and a chair that…
 DIY
Read →
DIY
Read →
Floating Shelf Ideas Around a Reading Chair That Actually Frame Your Seat
Picture 4 pm light, a linen throw over the arm of your chair, and one warm bulb glowing off a wood shelf…
 DIY
Read →
DIY
Read →
How to Build a DIY Book Nook Shelf Insert in One Weekend
Three pieces of foam board, a string of warm lights, and one quiet afternoon. That’s the whole recipe for a DIY book…